

GT-I8150 Ultimate Rooting Guide
Disclaimer
1. I`m not responsible if you damage your device, lose important data, or brick your device before, during, or after the process. It is at your own risk.
2. This will void your warranty.
Please Backup Your Data!!!!
Download these files and put them in the root external SDcard (Do not extract any file!):
Rooting Package (update.zip)
ClockworkMod Recovery (recovery.img)
Android Terminal Emulator (Google Play)
CyanogenMod 9 (Android 4.0.4)
Google Apps
1. Rooting
Of all the dozen ways to root, I picked the simplest, fastest, safest and geekiest way.
1. Move the update.zip to the root of your phone ( /sdcard).
2. Confirm that the file is there. Then, turn off your phone.
3. Boot into recovery mode. Press and hold the volume up button+home button+power button. When you see the Samsung LOGO (The first one), let go of the power button ONLY!

4. When you see Andy (the Android logo) beside a box, release everything and press the menu button.
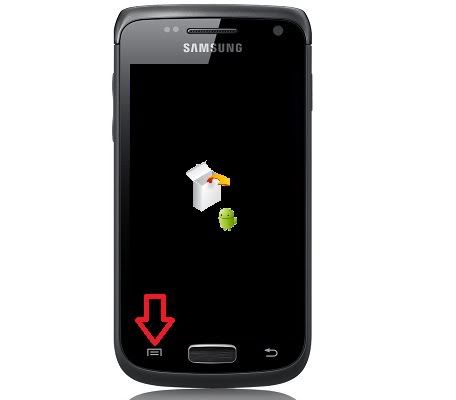
5. The screen will gray out and go to recovery mode. Navigate up/down using volume buttons to Apply Update from SDCard and press the home button. Using the file explorer, search for your update.zip and press the home button.
6. Wait for a while and when the recovery menu comes out again, select Reboot System Now and press the home button.
YOUR PHONE IS ROOTED! CONGRATULATIONS!!!
2. Flashing ClockworkMod
You`ve probably heard of ClockworkMod (You`re not a geek if you don`t). Actually, you don`t need a PC to flash this too! Make sure you have downloaded the Android Terminal Emulator (Google Play) , then we can start.
1. Move the recovery.img to the root of your phone.
2. Start the Android Terminal Emulator.
3. Type in "su" (without the quotes ") and press enter. A popup requesting for Superuser access will open. Press allow.
4. Next type in "dd if=/sdcard/recovery.img of=/dev/block/mmcblk0p13 " (without the quotes ", that`s a zero 0, not the letter O) Don`t mess up, or you will end up with a bricked device.
5. Wait for a while and you`re done!
YOUR PHONE HAS CLOCKWORKMOD NOW! CONGRATULATIONS!!!
Take some drink first. <----- (Optional)
3. Flashing CyanogenMod 9 (Android 4.0.4)
Well, even an Android Geek beginner knows this OS. This step doesn`t require a PC, but will wipe the data on your phone.
1. Keep the CyanogenMod 9 & GApps file in your external SD card. Turn off your phone.
2. Take the external SD card out for safety precautions. Don`t put on the back cover.
3. Boot your phone to recovery (Volume Up+Home+Power, let go Power when Samsung comes out).
4. Now, navigate to Wipe Data/Factory Reset and press the home button. Confirm by navigating to the Yes and press the home button. Then Wipe Cache.
5. Wait for a while, and when the recovery menu comes out, insert your SD Card. Navigate to Mounts and Storage and choose Mount /external_sd.
6. Then, navigate to Install Zip from SDcard and then Choose Zip from External SDCard.
7. Choose the cm-9-20130730-UNOFFICIAL-ancora.zip.
8. Then, go there again and pick gapps-ics-20120429-signed.zip.
9. Now, choose Reboot System Now.
YOUR PHONE IS NO LONGER THE STOCK ANDROID!!! INTRODUCING CYANOGENMOD!!!!
Now, your phone will run at higher speed than the stock ROM does. Well, the UI is quite self explanatory. Now you can use root apps to Overclock your CPU (I recommend Set CPU for Root Users), hide the status bar (full+screen), auto tasking (Tasker), and most importantly, I can run the Sony SmartConnect App for my Smartwatch!!! Awesome! Have fun with your new device!
P.S. I`ll make a review on my new SW2 I received from my father. :)
GoodBye!
Credit to the author of these two pages; http://forum.xda-developers.com/showthread.php?t=1576874 and http://forum.xda-developers.com/showthread.php?t=1924846
No comments:
Post a Comment